Mamiya M645 Light Seals Placement Guide
Mamiya M645 Light Seals Placement Guide | M645 | M645 1000s | M645 J
USCamera Light Seals | Kits | Foam Sheets | Leica Film Cameras
Mamiya M645 Light Seals Placement Guide | M645 | M645 1000s | M645 J
Before doing anything, please read about seal removal and replacement.
Also, this Mamiya M645 light seal kit is always in stock.
Therefore, please contact us with any questions you may have. New parts, light seal kits and also downloads are added to our almost every day.
Tech Note: Most camera body channel seals are installed starting at the hinge end, working towards the latch side until the seal is used up
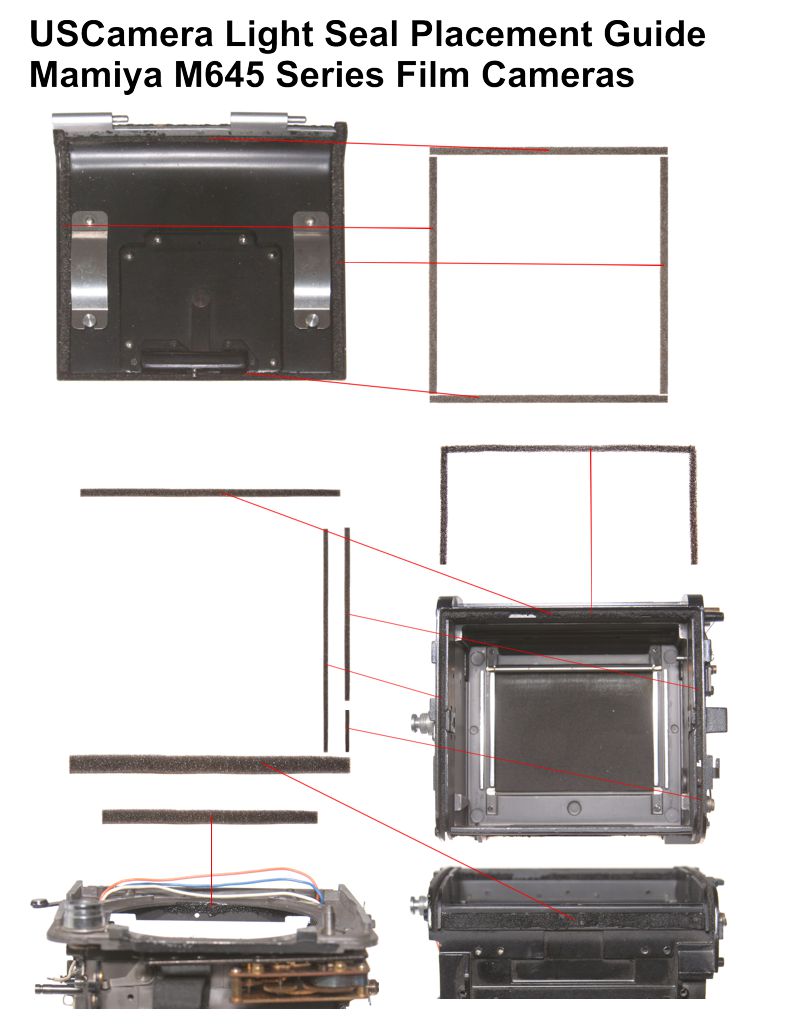
You are installing an 11 piece kit for the Mamiya M645 series of film cameras.
Back Cover
Note: The 2 shorter back cover seals are the top and bottom seals.
Bottom channel seal, back cover – 1 x 2mm
Top channel seal, back cover – 1 x 2mm
Left channel seal, back cover – 1 x 2mm
Right channel seal, back cover – 1 x 2mm
Camera Body
Top channel seal with adhesive, camera body – 1 x 2mm
Top channel seal, non-adhesive, camera body – 1 x 2mm *
Left channel seal, camera body – 1 x 1mm
Right upper channel seal, back cover – 1 x 1mm
Right lower channel seal, back cover – 1 x 1mm
Hinge seal, camera body – 1 x 2mm
Mirror cushion, camera body – 1 x 2mm
*Tech Note This is the last seal installed on the camera and should be glued down.
Important. The glue down seal pictured in the placement guide was cut into 3 pieces and glued together for the photo. The seal included in the kit is one long strip.
Installing Light Seal Foam With Contact Adhesive
You want to center this seal in the top channel, so fold the seal in half. Then locate the center of top channel in the body.
Now to the adhesive.
Contact cement is the adhesive recommended. ACE and also other hardware stores usually carry it. Goodyear Pliobond is the best, a tube is cheaper than a bottle, if you can find it. 80% of the seals installed in most film cameras were glued in place with contact cement.
Easy to apply with a toothpick but takes a little more time than other methods. Cameras only require small amounts of anything. You do not want to saturate the foam with cement where you are placing this seal.
Start by putting a small amount of the adhesive in a teaspoon. I am saying teaspoon because it is common, heavy and won’t move easily. You can use any small container you want that will hold a teaspoon of cement.
Mamiya M645 Placement Guide
Take the toothpick and touch the adhesive in the spoon and kind of twist it a little between your fingers, as you pull away from the spoon. Now you will have a small amount of adhesive on the tip. The adhesive will dry fast, so quickly apply the adhesive to the seal in the camera and place the seal in the channel and with the back of the bamboo tool, push it down a little to give the seals good contact. Hold the tool there for a few seconds. The seal you just placed should stay there. Now, wait an additional 2-3 minutes to let the adhesive set up. Test the bond by slightly pulling on the newly installed seal, it shouldn’t pull off where you placed it. The bond on the foam gets very strong after a few hours.
Again I want to stress, you do not want to saturate the foam already installed in the channel with adhesive. It will not be spongy foam if you do. You want to apply just enough adhesive to keep the seal in place. Light seal foam only starts sticking to back covers because the foam is old and sticky or the camera has sugar-based liquid damage. The latter happens more than you would imagine.
Applying Contact Adhesive. I recommend drawing a straight line a few inches long on a piece of paper. Then using the spoon and toothpick as above, practice applying a small amount of adhesive to the line and carefully spreading it. You will notice as the adhesive evaporates it becomes thicker. When you pull the toothpick out of the cement, it sort of “strings” as you pull away. That’s why you will want to twist the toothpick a little as you pull it away from the cement.
USCamera Light Seals | Premium Imported Open Cell Foam | Mamiya M645 Placement Guide
In addition, see all USCamera Light seal kits available for Mamiya, look here.
First of all, the most important and time-consuming work is removing the old seals. Focus on clean, clean, clean. Also, pay careful attention and clean all old residue from the door channels, mirror cushion area, door hinge area and anywhere else you are replacing the seals.
You need to understand the finest adhesive in the world will not adhere to that sticky, gooey residue that was once a quality light seal. Finally, an accurate installation will give you thousands of light tight exposures.
See all USCamera light seal kits for Mamiya and more, start here.
Mamiya M645 Placement Guide, USCamera Light Seals
USCamera | Service Parts for cameras, flash, lens, light seals, foam sheets, downloads + more | Mamiya M645 Placement Guide | Placement Guides |
USCamera Foam Since 1998 | Premium Quality Open Cell Foam Lasts Years | Also Same High-Quality Japanese Foam As Original | Mamiya M645 Placement Guide
Lastly, Mamiya cameras are now Mamiya Leaf or Phase One …. their website is not secure. Hum… look here.