
Minolta X-700 Tech Tips-1
Minolta X-700 Tech Tips -1 – Know Before You Buy
Different model cameras can have problems that can cause failures or malfunctions while using or after long periods of storage.
As a technician, I want to educate you on as many of these model-specific issues as I can remember or kept notes about.
If you ask questions that might jog my memory, I could be able to provide you with more insight and write more Technical Problem pages. I already have many common issues to address.
You may be asking yourself, why is he doing this? Go here for that info.
The Minolta X700, introduced in 1981, was a very popular camera for the features, accuracy, and accessories available. TTL flash, data backs, program backs, motor drives and much more. Also accepting most Minolta bayonet lenses made.
Many of these Minolta X700 camera bodies developed the same problems over time. It’s not bad, it’s a Minolta X-700 film camera issue. Also, most issues can be prevented by the user. Other issues need a technician or a good DYI person who preferably has worked on the X700s before.
If you are buying one these cameras to use and enjoy, cosmetics mean less than the guaranteed accurate operation.
Minolta X-700 Tech Tips -1
I would consider this issue the most damaging problem for an X-700 that was stored with the batteries in the camera.
The camera’s display operates properly in all modes. However, with the shutter charged and the release button is pressed, the camera doesn’t release or the LED display lights go out.
Also turning the main switch on and off only lets you repeat the same malfunction.
Common problem-1,
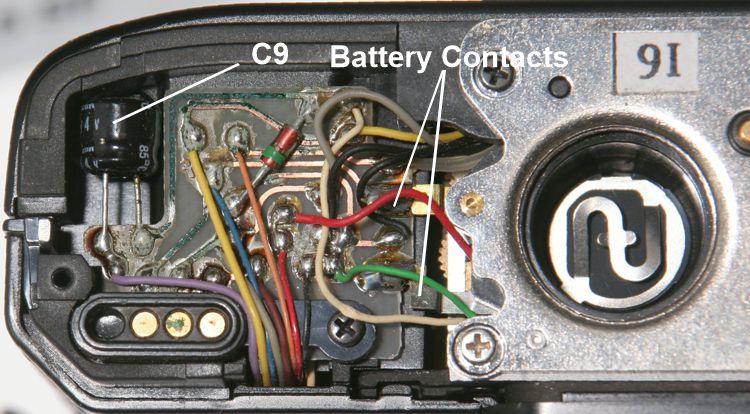
- Capacitor C10 leaking on the connector PC board on the bottom of the camera. This capacitor should be checked and replaced on any X700 leaking or not. As you can see in the pic, the bottom PC board in the of this camera is already damaged from the capacitor. This board may be able to be cleaned up, we’ll see.
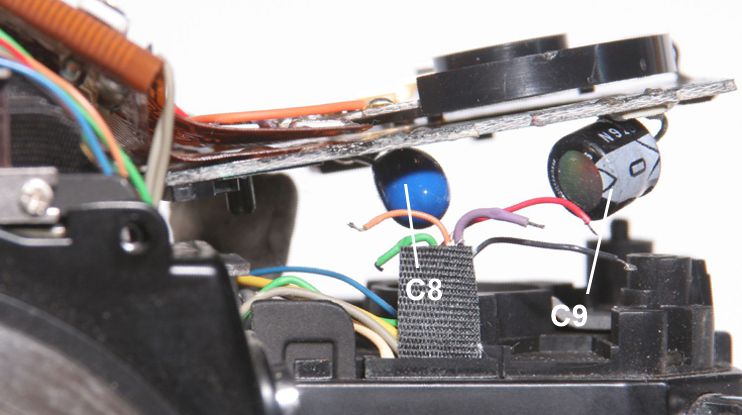
- Capacitor C9 leaking on display circuit board – doesn’t look like it leaked… yet.
- Capacitor C8 leaking on the display circuit board – doesn’t look like it leaked… yet.
Yet = The components are over 30 years old. Look at them every so often or replace them now.
C9 and C10 Capacitors replacements are available here.
This is a very common issue on the connector PC board and easily checked by removing the bottom cover.
NOTE. You can tell the corrosion is not from the batteries as there is no corrosion on the terminal connections from the battery compartment.
You will need to remove the top cover in order to check the display board.
The display board on this Minolta camera was multi-layer and had connections from the top to the bottom, these capacitors leaking could severely damage this board and make it unusable.
Damaged display PCB requires replacing the main-flex since you cannot separate the display board from the assembly.
Minolta made several versions of the main flex stamped on top of the flex. All Main Flex parts start with 2017-0401-XX, replace the XX with the last 2 digits from the number stamped on the FPC.
Below are notes I kept on replacing the main Flex on the X-700…
2017-0401-01 – replace with 2017-0401-02
2017-0401-02 – 1 of 2 Last Main Flex Available
2017-0401-03 – replace with 2017-0401-02
2017-0401-32 – Has the sub-PCB is mounted on the flex, front, wind side – replace with 2017-0401-35
2017-0401-33 – Has the sub-PCB is mounted on the flex, front, wind side – replace with 2017-0401-35
2017-0401-35 – 2 of 2 Last Main Flex Available
2017-0401-81 – original version with sub-PCB on top of IC1. Also, a sub-PCB is mounted on the flex, front, wind side.
2017-0401-82 – Also, a sub-PCB is mounted on the flex, front, wind side – replace with 2017-0401-02
First produced over 38 years ago and parts are plentiful.
In addition, I am not writing these tips to scare customers away from buying Minolta X700s, they are fine cameras.
However, like most electro-mechanical cameras, they need attention at times.
These issues can be addressed by checking the camera yourself or having a technician do that for you.
More Minolta X-700 Tech Tips posts to follow.
If you have other questions about your X700’s performance, also troubleshooting other issues your camera may have, contact me. I should be able to help you.
Gray
Minolta X-700 Tech Tips-1
Minolta X-700 Tech Tips-1


My Minolta x/700 don’t reach enough speed for take picture, always show red down arrow in the visor. How can I fix this problem?
Thank you.
It could be the capacitors on the display board have leaked. That is a very common issue. I need to see your camera. We do not charge to take a look, test your camera and provide you with an estimate. Best if you give me a call and I can talk to you about your camera. Gray.
Any idea why minolta motor drive 1 would not power on.
Gracias!!!!!!!!!!!!
Glad the light seal installation information helped you. Gray