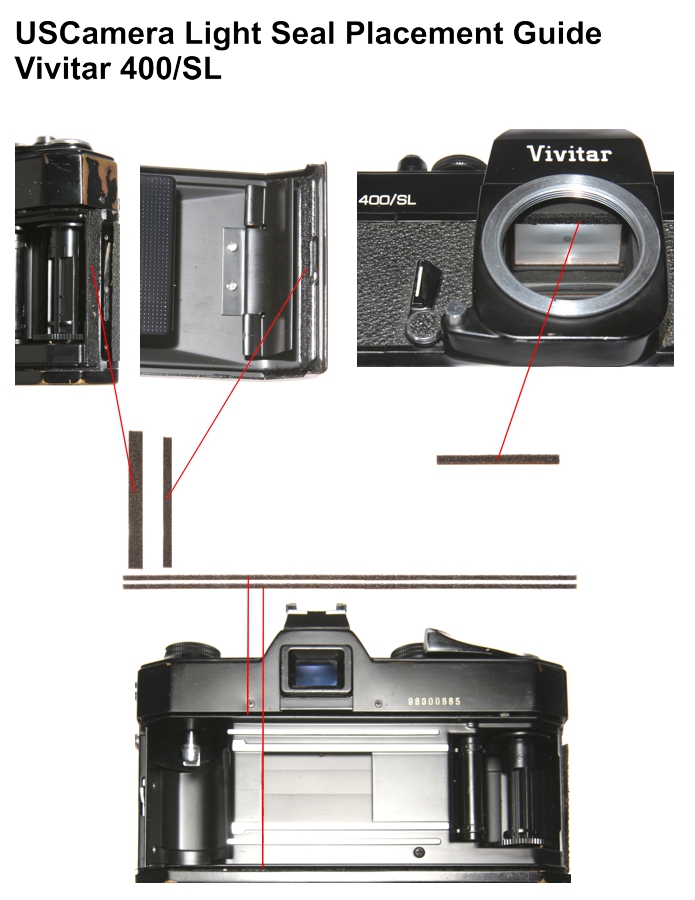
Vivitar 400/SL Light Seal Placement Guide
Vivitar 400/SL Light Seal Placement Guide
Before doing anything, please go here
Vivitar 400/SL Light Seal Placement Guide
For more information on purchasing this kit, go here
You are installing a 4 piece kit for the Vivitar 400/SL cameras
This light seal kit includes,
Bottom channel seal, camera body – 1 x 1mm
Top channel seal, camera body – 1 x 1mm
bottom channel seal, back cover – 1 x 3mm
mirror cushion – 1 x 2mm
latch plate seal, back cover – 1 x 2mm

General Installation Guidelines
Tech Note. It is easier to install the back cover hinge seal and work on the back cover with it removed from the camera (but not necessary). It is difficult to remove the hinge pin, so you will need to carefully lift up the front grip side leatherette near the hinge it will expose the 3 hinge retaining screws. If the leatherette is very brittle and breaks into pieces when attempting to lift it up, it is best to leave the film back attached to the camera.
Hinge Seal, Camera body
Install this seal centering it between the top and bottom door channels.
Latch plate seal, back cover
Notice the inside lip on the door latch plate by the film cassette spring. Install by centering this seal on that lip.
Door channel seals, Camera body
Install the upper and lower camera body channel seals starting at the hinge side of the camera body, working from left to right. The upper channel has the counter actuation lever. You will need to install this seal as close to each side of the counter lever opening as possible. However, do not let the seal interfere with the counter actuation lever.
Mirror cushion
Now, with the utmost care, remove the old and install the new mirror cushion. Remember if anything touches the focusing screen, it will likely be permanently damaged.
USCamera | Parts for cameras, flash, lens + | Vivitar light seals | service downloads | Vivitar 400/SL Light Seal Placement Guide
The most important and time-consuming work is removing the old seals. Focus on clean, clean, clean. Clean the old residue from the door channels, mirror cushion area, door hinge area and anywhere else you are replacing the seals. The finest adhesive in the world will not adhere to that sticky, gooey residue that was once a quality light seal. Proper installation will give you thousands of light tight exposures.
See all USCamera light seal kits for a and more, start here.
USCamera Since 1998 | Service Parts for Cameras Lenses | Light Seal Kits | Vintage Film Cameras | Vivitar 400/SL Light Seal Placement Guide
Lastly, always made to inspire…see New film camera products.


