
USCamera Light Seal Placement Guide | Mamiya RB Film Back
USCamera Light Seal Placement Guide | Mamiya RB Film Back
USCamera Light Seal Placement Guide | Mamiya RB 120 220 645 Film Back and Insert
For more information on purchasing this kit, go here
You are installing a 10 piece kit for the Mamiya RB PRO PRO S Film Back
Also, this guide covers both the film back insert and shell.
USCamera Light Seal Installation and Placement Help – Mamiya RB Pro / Pro S 120 220 645 Film Back Insert
Before you do anything, please read general instructions on installing light seals here.
Next, take all of the seals out of the kit and lay them out on your work area.
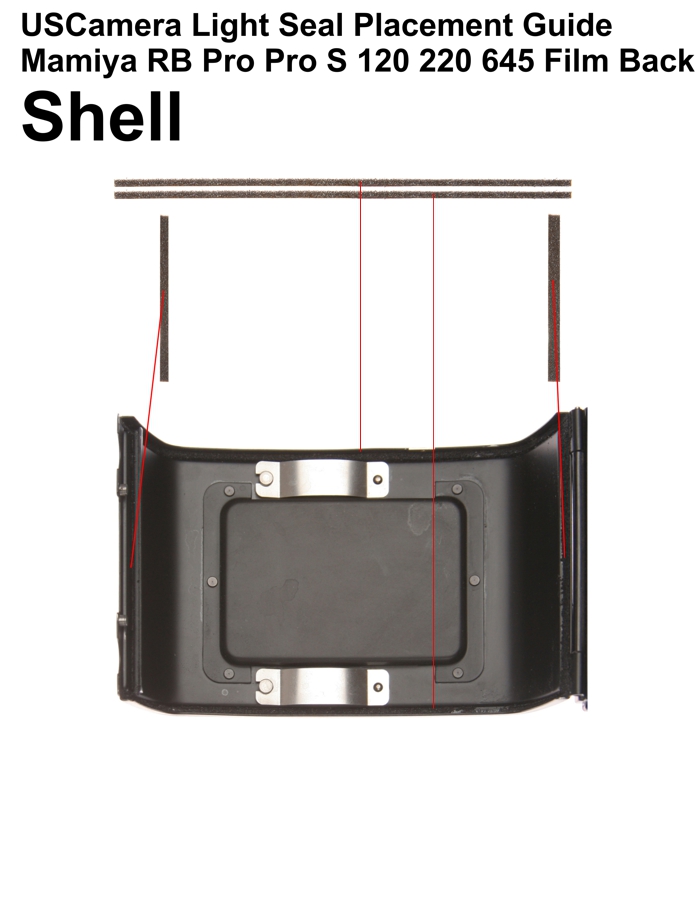
RB shell kit.
top/bottom cover door channel seals – 2 x 1mm
short – top/bottom mech plate seal, left – 2 x 2mm
long – top/bottom mech plate seal right – 2 x 2mm
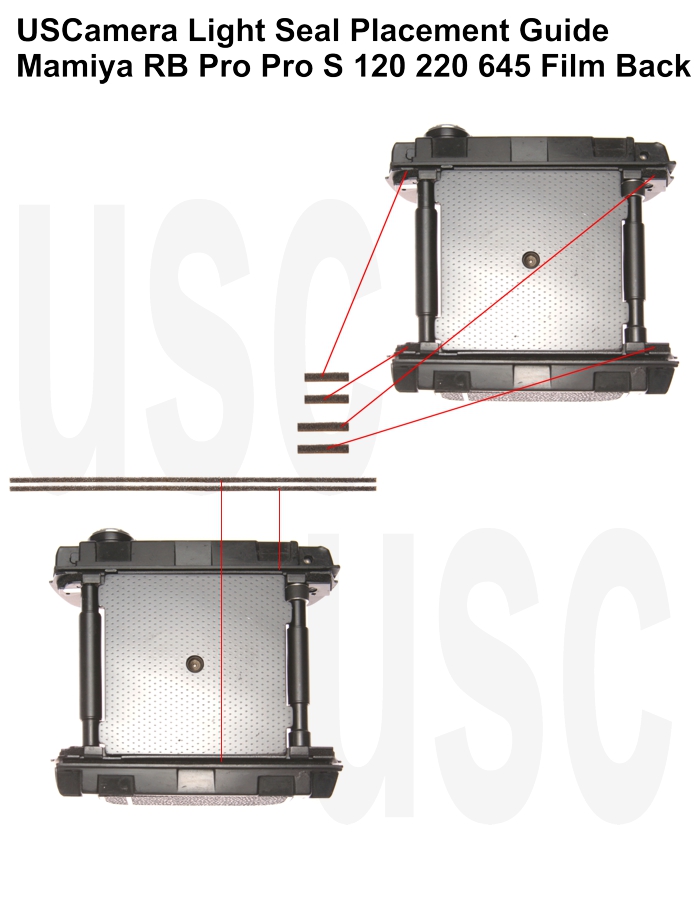
RB insert kit.
top/bottom door channel seals on the back cover – 2 x 1mm
back cover hinge seal- 2 x 1mm
back cover door latch seal – 2 x 2mm
Tech Note. It is much easier to install the light seals on the inserts top and bottom covers if the covers are removed from the insert. Also, note the double exposure lever by the wind lever on the PRO-S film backs only. If you move the DE lever and see the red dot exposed, you will notice the DE blocking lever (see pic) moves to cover and uncover an opening in the top cover.
The bottom cover removal is straightforward, 2 screws on the top cover and 2 screws on the lower mech plate near the spool guides. To remove the top cover remove the 4 cover retaining screws, 2 on the top cover and 2 from the upper mech plate near the spool guides. Remove the leatherette cover on the wind lever cap to expose the slotted retaining screw. Note. The small Phillips screws exposed when you removed the leatherette cover do not need to be removed.
After removing the slotted wind lever retaining screw carefully remove the wind lever. Now, carefully push the DE blocking lever into the retracted position with your tweezers points and lift the top cover up, left and off towards the right side to allow the DE blocking lever to clear the top cover.
General Light Seal Installation Guidelines
Film Back Shell
Door channel seals, back cover
Install these seals first. starting right, at the hinge side and working towards the left.
Hinge seal, back cover
This seal is installed after the door channel seals. Install this seal starting at the top, center it between the top and bottom edge of the door channels. This seal is placed over the top of the channel seals you first installed.
Latch plate seal, back cover
Install this seal by centering it in the latch channel.
Film Back Insert
Mech plate seals
Install these 4 seals per the image below. USCamera Light Seal Placement Guide | Mamiya RB Film Back
Channel seals, insert
Easiest to install these 2 seals with the covers removed. See Technote.
Also, the most important and time-consuming work is removing the old seals. Focus on clean, clean, clean. Clean the old residue from the door channels, mirror cushion area, door hinge area and anywhere else you are replacing the seals. Furthermore, the finest adhesive in the world will not adhere to that sticky, gooey residue that was once a quality light seal. Most important, proper installation will give you thousands of light tight exposures.
See all USCamera light seal kits for Mamiya and more, start here.
USCamera | Thousands of parts for cameras, flash, lens, light seals, foam sheets, downloads + more | USCamera Light Seal Placement Guide | Mamiya RB Film Back


Based on where I have had to remove the old seals on the Film Insert. Shouldn’t the long thin seals be in the groves on the pressure plate side?
Thanks for the heads up on that. I corrected the information and adjusted the pics.
The thin strips need be applied to the channels on the back side of the film insert. The four small seals fit in cut outs in four corners of the insert on the pressure plate side. Thanks for contacting me, let me know if I can you anytime. [email protected]
This kind of hard earned knowledge should be shared like this! Thank you for what you guys are doing for the craft
Glad to help. That is why we are here. Gray
hi,
Are the seals the same for the RB67 and the RZ67 mamiya ? thanks
Sorry no, the light seal kits used with those film backs do not interchange.