
Mamiya M645 Series Body Light Seal Placement Guide
Mamiya M645 Series Body Light Seal Placement Guide
Mamiya M645 Series Body Light Seal Placement Guide
You will need a small amount of contact cement that is foam friendly and toothpicks to apply it.
Also, I found Pliobond was the best adhesive to use.
Before doing anything, please go here.
For more information on purchasing this kit, go here.
You are installing an 11 piece kit for the Mamiya M645 1000 / 1000S / M645 J back cover and channel seals.
A custom cut kit for the mirror frame and mirror cushion is available here.
Take all of the seals out of the kit and lay them out on your work area. This kit includes,
Body Channel Seals x 7 pieces
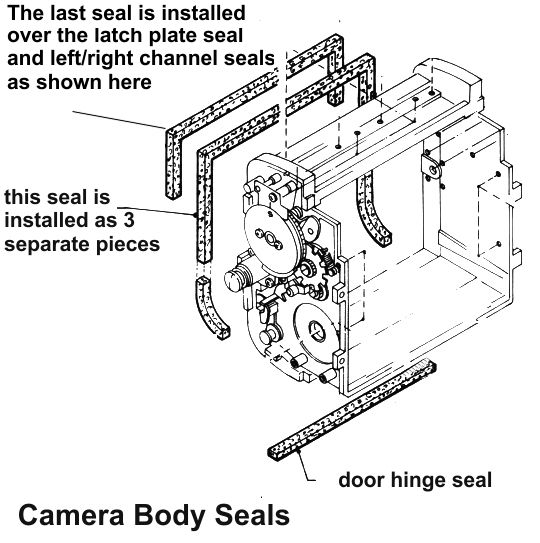
1 x 2mm – latch plate seal, camera body
4 x 1.5 mm – channel seals, camera body
1 x 2mm – door hinge seal, camera body
1 x 2mm – seal without adhesive
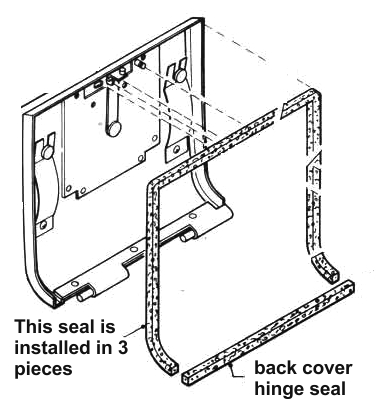
Back Cover Seals x 4 pieces
3 x 2 mm – channel seals, back cover
1 x 2mm – rear cover hinge seal, camera body
Mamiya M645 Series Body Light Seal Placement Guide
Tech Note. The last foam applied to the camera body is the seal without adhesive. You want to center it best as possible
but it does not have to be perfectly centered. Also important to note, you do not want to saturate the foam with adhesive.
If you do, when the adhesive drys it is no longer very flexible.
Pick up a tiny bit of the adhesive on the toothpick. Immediately apply it to the center of the foam seal already in the camera body
and stick the foam in place on. Leave the foam alone until it sets up enough to stay where applied. Then you can work way
across the top and down the side channel. Try not to stretch that top seal at all when installing.
Look carefully at the image from the Mamiya parts list and see the top seal is not supposed to completely fit the channel all the
way to the bottom of the camera by the hinge seal.
Let that last seal dry overnight before installing and closing the back cover.
Opening the back cover hint. You will find the back cover always pops open much easier if there is a film insert installed in the body.
The most important and time-consuming work is removing the old seals. Always focus on clean, clean, clean.
Clean the old residue from the door channels, mirror cushion area, door hinge area and anywhere else you are replacing the seals.
Remember, the finest adhesive in the world will not adhere to that sticky, gooey residue that was once a quality light seal.
A proper installation will give you thousands of light tight exposures.
USCamera Since 1998 | Service Parts for Cameras Lenses | Light Seal Kits | Vintage Film Cameras | Mamiya M645 Series Body Light Seal Placement Guide
Lastly, always made to inspire…see New film camera products.


Trying to track down the cause for flat, dull negatives when using speed lights with my 645 1000s led me here. I thought it might have been a shutter speed issue, and so I hadn’t considered light leaks. The thing is, some photos come out clear, sharp, and bright, especially those taken outside in natural light. Why would my negs lit by flash be coming out flat? Anyway, thanks for this article. One more thing to consider.
Hello Ken, There are only 3 exposure issues when shooting with a flash on M645. 1. Make sure you are connecting your flash cable to the X-Sync terminal. The accessory shoes like on the PD finders are always connecting to X sync contacts. 2. Make sure the shutter speed is set to 1/60th. 3. Aperture setting on the lens, based on the flash to subject distance is the only other variable when shooting indoors with flash. If you had light leaks on your outdoor shots you would definitely notice, light leaks are not very subtle on that camera. Check the back cover hinge seal by rubbing your finger across it. If that seal is sticky or just kind of rolls up, they are not good just not leaking yet.
Hope that helps you.
Jerry
Hello. I just purchased this kit. I was wondering, with these strips that already have adhesive on them, do you still recommend using a retardant (water, alcohol) when applying them? Thank you in advance.
Hello Daoxiaomian,
Yes, all our foam seals have an adhesive backing, unless the camera requires non-adhesive foam.
On the M645 there is 1 non-adhesive seal, which is placed over the latch plate seal seen in the guide above.
Yes, you should always use an adhesive delay when installing the foam, so you can easily slide the foam into place.(50% alcohol or less)
Kindest regards,
Michael