Mamiya C220F C330 Finder Frame Seals Style-1
Mamiya C220F C330 Finder Frame Seals Style-1 Placement Guide
USCamera Light Seals | Kits | Foam Sheets | Mamiya Film Cameras
Mamiya C220F C330 Finder Frame Seals Style-1 Placement Guide
Before doing anything, please read about seal removal and installation.
These Mamiya Finder Frame seals Style 1 is always in stock.
We add new parts, also light seals, and downloads are added almost every day.
Please contact us with any questions or requests you may have.
Tech Note: Most camera body channel seals are installed starting at the hinge end, working towards the latch side until the seal is used up. I will list that difference here.
Mamiya Finder Frame Style-1Seals. See all light seal placement guides currently available.
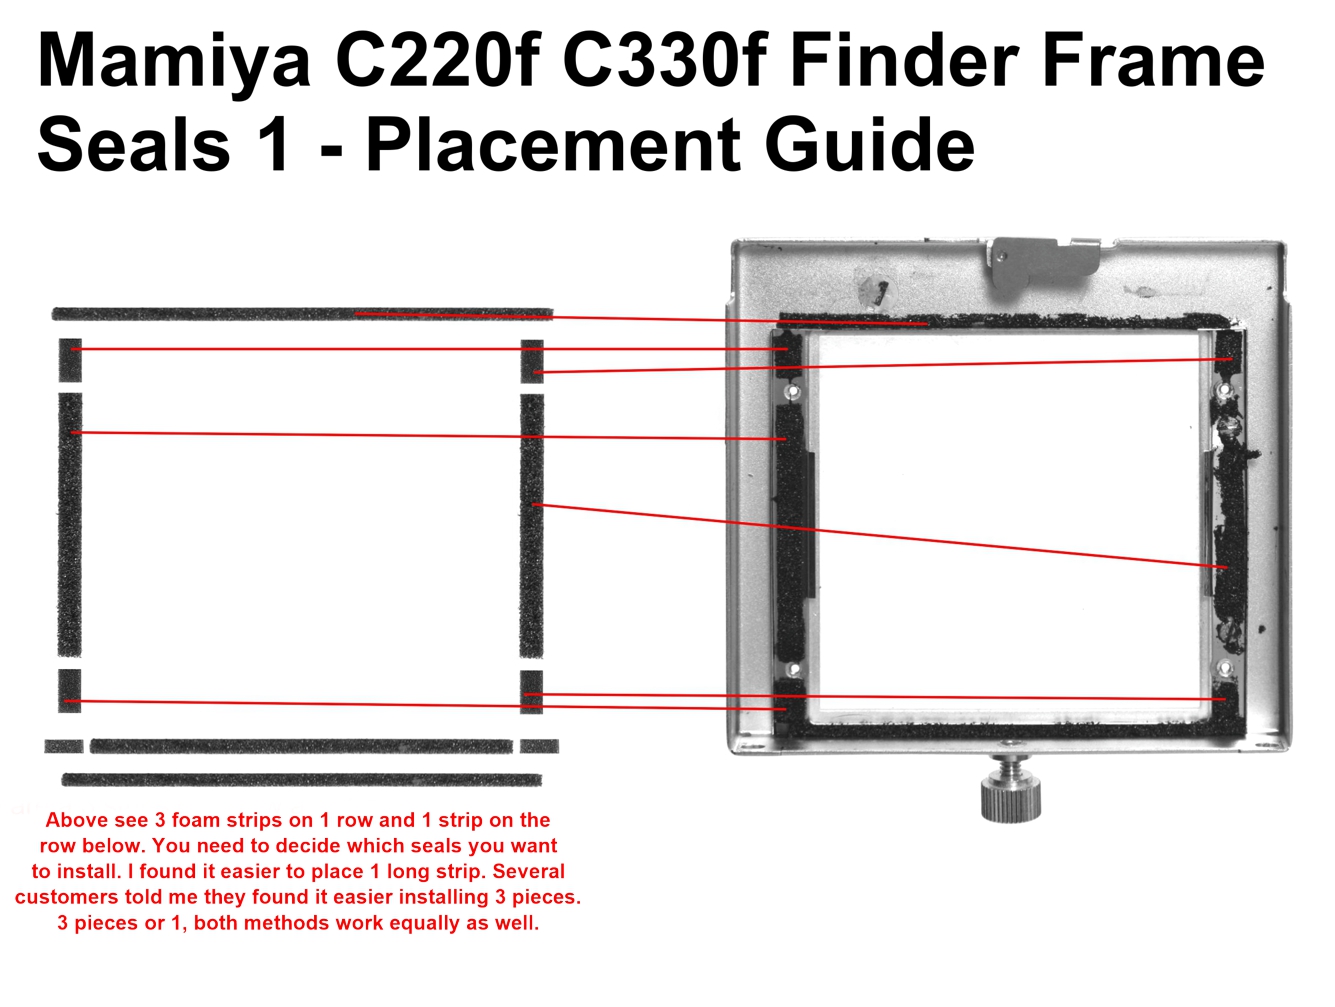
You are installing a 11-piece kit for the Mamiya C220F or C330F TLR finder frame, Style-1.
The Foam kit used with this frame includes, starting at the back of the frame,
using these 3 x 2mm wide foam pieces
short 2mm wide foam pieces x 2
long 2mm wide foam piece x 1 or
1 piece, longest 2mm wide foam piece x 1
small 2mm rectangular foam pieces x 4
2 long wide rectangular foam pieces x 2
2mm wide long foam piece front frame x 1
Mamiya C220F C330 Finder Frame Seals Style-1 Placement Guide

Mamiya C220F C330 Finder Frame Seals Style-1 Placement Guide
Please note that most of the manufacturers used glue down foam. We are not using that type of foam for this install. I have found certain issues arise when applying self stick foam such as with this finder frame.
I would advise against using any type of adhesive delay. It could contaminate the glass you have cleaned or damage the focusing screen.
It was obvious when I disassembled this C330f screen frame that Mamiya wanted frame glass spaced exactly 2mm from the back of the frame. These are the dimensions what I measured using a NSK caliper.
The issue with installing the back seal is when you have put the right and left glass holders in place. This seal needs be placed 1st.
I usually find the center of foam by either measuring or folding the seal in half then, with a sharp tweezers point, just slight mark in the adhesive, that mark will mean nothing when the seal is placed. If you use only the long piece, you will need place the seal in the center of the frame, carefully keeping both ends up enough to slide the glass in place against the back seal then sliding the glass holder underneath and pressing the seal down at the ends. Install the screws in the glass holders.
Alternately you can use the 3-piece back seal parts. Those three pieces combined are the same length as the long seal.
Place the long seal centered in the finder frame and press it firmly in place. Then. place the finder glass against the foam, put the glass holders in place and install the screws. Place the 2 smaller pieces at each end.
Now install the remaining seals per the placement guide.
Mamiya C220F C330 Finder Frame Seals Style-1 Placement Guide


