Yashica FR FR1 FR2 Light Seal Placement Guide
Yashica FR FR1 FR2 Light Seal Placement Guide
Next, you will need to take all of the seals out of the kit and lay them out on your work area.
Yashica FR FR1 FR2 Light Seal Placement Guide
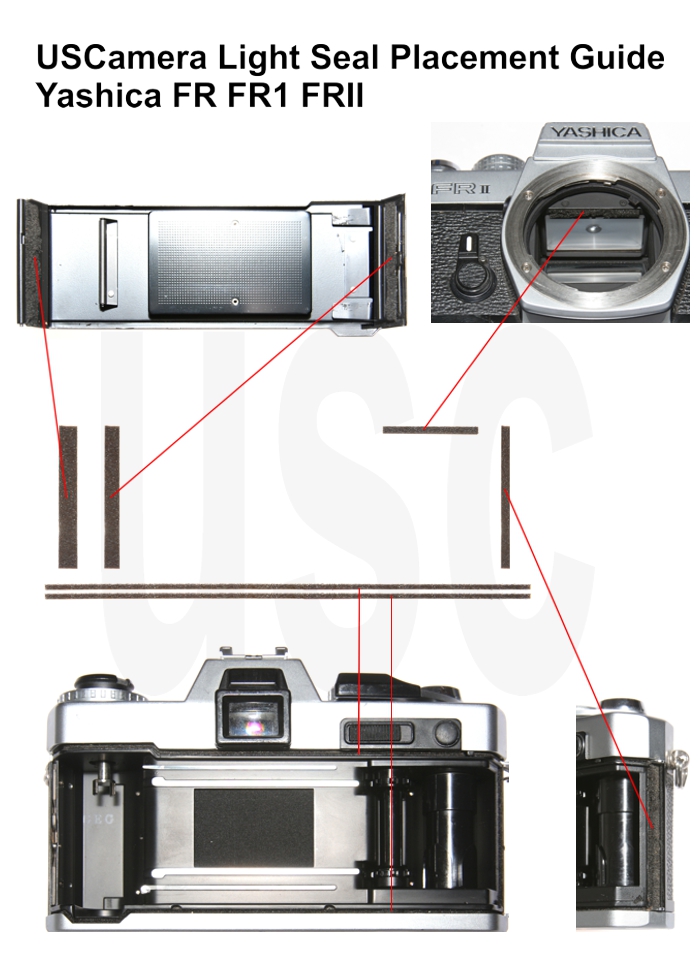
This kit includes,
Lower channel seals for the camera body – 1 x 1mm
Upper channel seals for the camera body – 1 x 1mm
Latch plate seal, latch end of back cover – 1 x 2 mm
Hinge seal, hinge end of back cover – 1 x 1mm
Hinge Seal, hinge end of camera body – 1 x 1mm
Mirror cushion – 1 x 2mm
Tech Note
You will need to remove the back cover from the camera body. If you look carefully at the hinge side of the back cover.
Many FR series cameras have a very small slotted screw attached to the hinge pin. That pin will retract if you push straight down on the screw with your fingernail and you can remove the back cover from the camera body.
If the small screw is not visible, you may be able to push down on the hinge pin with a tweezers point and remove the back cover from the camera body.
Use Caution….
as the hinge pin is spring loaded, you do not want to launch it across your room.
If you are unable to remove per the instructions above, you will have to remove the bottom cover, then the 2 screws that hold the lower hinge pin pivot in place.

General Installation Guidelines
Back cover, door latch plate seal
Install the 2mm thick seal on the latch plate, centering the seal on the latch plate between the top and bottom edges of the back cover.
Back cover, hinge side seal
Install this 2mm x 7mm wide seal on the hinge side of the back cover, starting at the top edge of the door channel, horizontally aligned with and butted against the hinge edge.
Camera body, hinge side seal
Install the hinge seal on the camera body starting at the top and working down.
Camera Body, door channel seals
Install the upper and lower back cover channel seals starting at the hinge side on the camera body.
Work from right to left.
The upper channel has the counter actuation lever. You will need to install this seal as close to each side of the counter lever opening as possible.
Tech Note. CAUTION and do not be fooled
…by what appears to be an easy removal of the focusing screen retainer, which the mirror cushion attached to. Only 2 screws, Yes, but the focusing screen retainer plate holds the screen frame and screen spring in place also. It takes great care and practice to reassemble those pieces without damaging the Fresnel.
Mirror Cushion
Now, with the utmost care, install the mirror cushion. Center the cushion on the focusing screen retainer plate. This cushion is not intended to fit edge to edge of the mirror box sides like many mirror cushions. Remember if any thing touches the focus screen, it will likely be permanently damaged
The most important and time-consuming work is removing the old seals. Focus on clean, clean, clean. Clean the old residue from the door channels, mirror cushion area, door hinge area and anywhere else you are replacing the seals. The finest adhesive in the world will not adhere to that sticky, gooey residue that was once a quality light seal. Proper installation will give you thousands of light tight exposures.
USCamera | Thousands of parts for cameras, flash, lens, light seals, foam sheets, downloads + more | Yashica FR FR1 FR2 Light Seal Placement Guide
Lastly, always made to inspire…see New film camera products.


