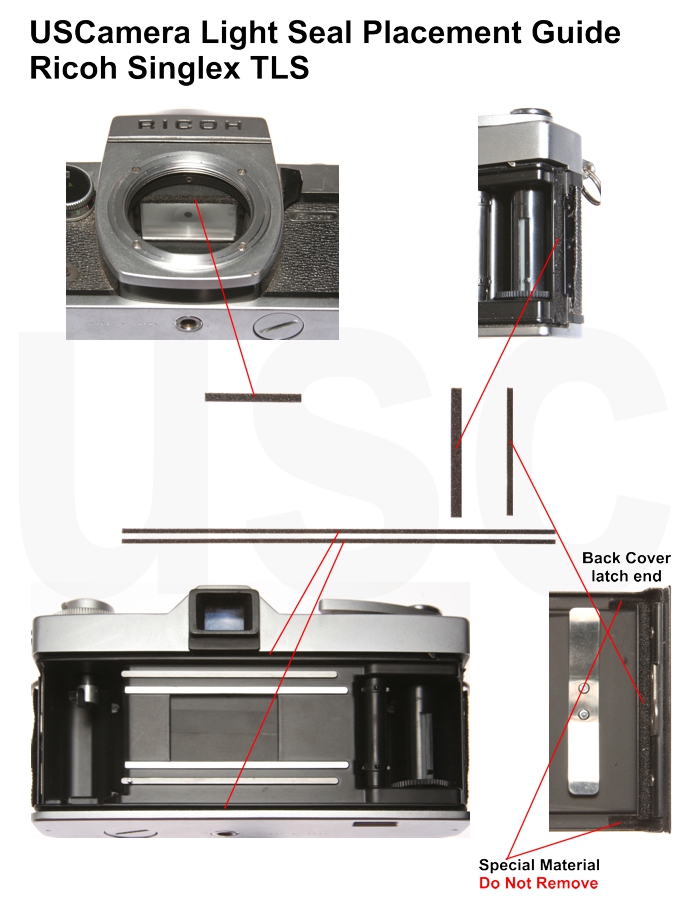
Ricoh Singlex TLS Placement Guide
Ricoh Singlex TLS Placement Guide
Before you do anything, please read the general instructions on removing and installing light seals here.
Ricoh Singlex TLS Placement Guide
Next, take all of the seals out of the kit and lay them out on your work area. This 5 piece kit includes,
Lower channel seal, camera body – 1 x 1mm
Upper channel seal, camera body – 1 x 1mm
Hinge seal, hinge side camera body – 1 x 1mm
Latch plate seal, latch end back cover- 1 x 2mm
Mirror cushion – 1 x 2mm
For more information on purchasing this kit, go here

General Installation Guidelines
New to light seal installation? I always recommend starting with the shorter seals first.
Please note. On the back cover, latch end per the image above. 2 special material pieces help prevent wear from rubbing as the door is opened and closed. These pieces do not need to be removed. I have looked at many cameras using this type of material and have not seen it worn beyond use. More common is someone removing them in anticipation of replacing them.
Hinge Seal, camera body. Install this seal on the hinge side of the camera body. Starting at the top and pressing into place.
Channel seals, camera body. Install the upper and lower camera body channel seals starting at the hinge side on the camera body, working from right to left. The upper channel has the counter actuation lever. You will need to install this seal as close to each side of the counter lever opening as possible, cutting the seal as required.
Latch plate seal, latch end back cover. Install this seal in the channel just below the latch plate. See the image above.
Mirror cushion. Replace the mirror cushion centering it between the sides of the mirror box. Use caution and remember if anything touches the focusing screen, it will likely be permanently damaged.
USCamera Since 1998 | Pro Light Seal Installation Available | Light Seal Kits | Vintage Film Cameras | Ricoh Singlex TLS Placement Guide
Lastly, always made to inspire…see New film camera products.


