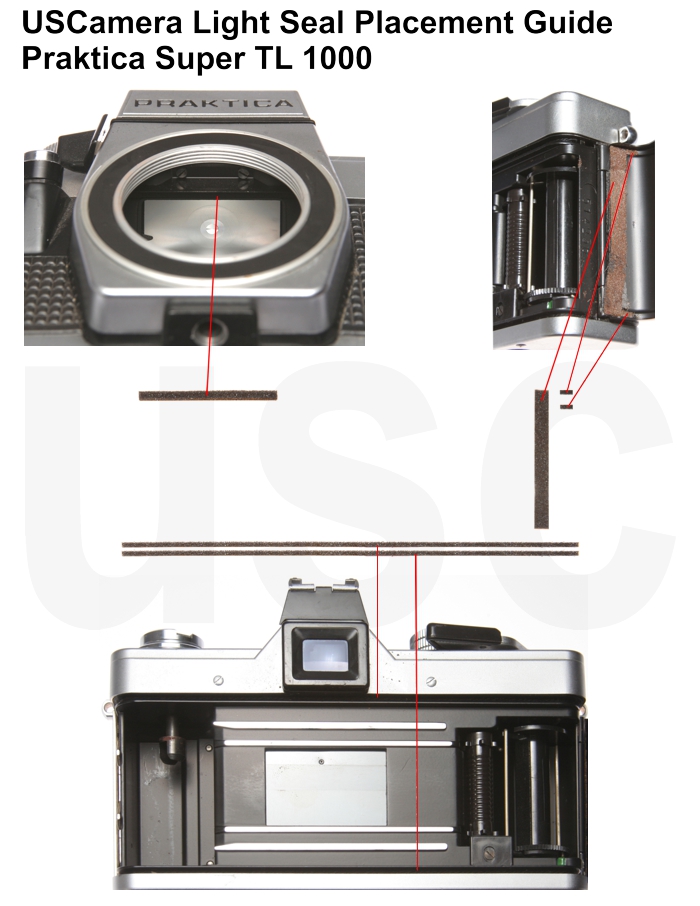
Praktica Super TL 1000 Placement Guide
Praktica Super TL 1000 Placement Guide
Custom Light Seals | Praktica Film Cameras
Praktica Super TL 1000 Placement Guide
Before you do anything, please read the general removal and installation instructions here.
Please Contact us for any questions you may have. Also, new light seal kits and parts are added every day.
For more information on purchasing this kit, go here
Top Quality kits using imported open cell foam.
Do you want to make your own light seal kit? Maybe you have a special film camera accessory that requires a special size of the light seal material. We are here to help.
Sometimes customers find sheet foam is the best solution. We have photo grade sheet foam material with adhesive, in a thickness of 1mm, 1.5mm, 2mm, 3mm, and 4mm available here.
In addition, we have many different strips of light seal material already cut to width and 220 mm long here.
For help installing light seal kits please go here. Following the link to that short read can improve the quality of your light seal installation.
USCamera light seal kit placement guides can really help you.
Especially if the old light seals have already been removed before you acquired the camera. go here
See all USCamera Light seal kits available for Praktica
Always exciting, Praktica film cameras may be in the past, for now, however, Praktica is still going strong here.
USCamera | Parts for cameras, flash, lens | light seals, foam sheets | service downloads | USCamera Light Seal Placement Guide | Praktica Super TL 1000
You are installing a 6 piece kit for the Praktica Super TL 1000, Praktica Super TL3
USCamera General Installation Guidelines
Next, take all of the seals out of the kit and lay them out on your work area.
This 6 piece custom light seal kit includes,
Lower channel seal, camera body – 1 x 1mm
Upper channel seal, camera body – 1 x 1mm
Hinge seal, camera body – 1 x 1mm
Bottom small channel seal, hinge end back cover – 1 x 1mm
Top small channel seal, hinge end back cover – 1 x 1mm
Mirror cushion – 1 x 2mm

Tech Note 1. Looking at the mirror cushion area you will see a metal baffle plate with 2 screws. The screws retain the baffle plate only. Also, easier to replace the mirror cushion with the plate removed. However, the cushion used on this camera is a foam cushion covered with a flocking material. Very unique. Unless for some reason this cushion has been damaged, it should not need to be replaced.
Channel seals, back cover
On the hinge end of the film back, place the small channel seals in place by butting them up against the hinge seal, as pictured
Hinge seal, camera body
This seal is installed by centering the seal between the upper and lower door channels on the back cover.
Door channel seals, camera body
When installing the channel seals on the camera body, always start at the hinge side and work to the left.
Mirror cushion
Install this cushion only if needed. see Tech Note 1
USCamera | Thousands of parts for cameras, flash, lens, light seals, foam sheets, downloads + more | USCamera Light Seal Placement Guide | Praktica Super TL 1000


