USCamera Light Seal Placement Guide | Olympus XA1
Before doing anything to your camera. Please go here
USCamera Light Seal Placement Guide | Olympus XA1
For more information on purchasing this kit, go here
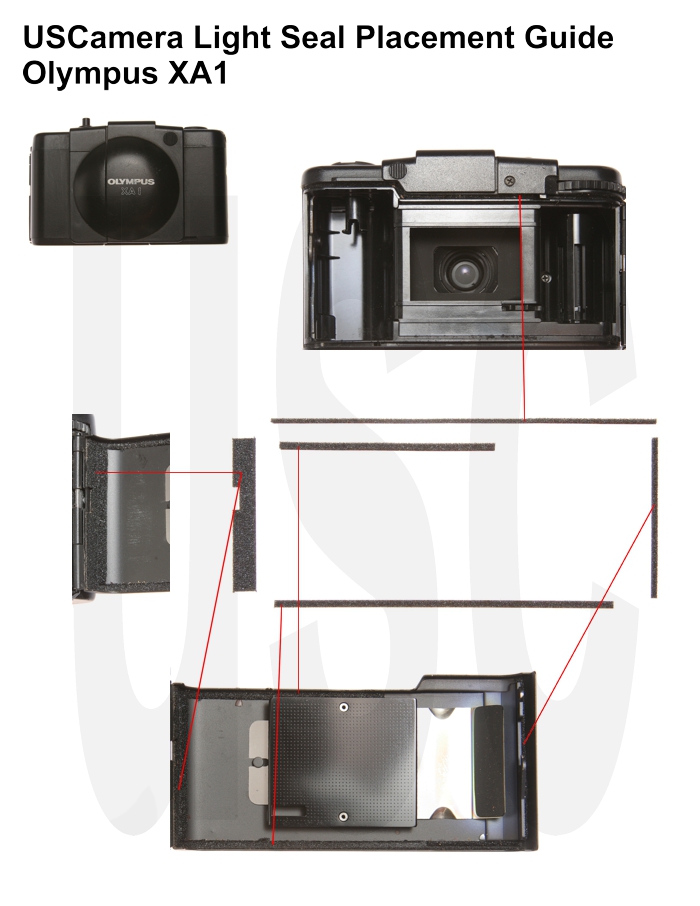
You are installing a 5 piece kit for the Olympus XA1
Take all of the seals out of the kit and lay them out on your work area. This kit includes,
Upper channel seal, camera body – 1 x 1mm
Bottom channel seal, back cover – 1 x 1mm
Top channel seal, back cover – 1 x 1mm
Latch seal, back cover – 1 x 2mm
Hinge seal, back cover – 1 x 2mm
Tech Note The original black paint used on the inside of the back cover, doesn’t like to be disturbed. Furthermore, the paint/finsih may(very likely) start to flake off when removing the seals whether using a solvent of any kind or not. Though time-consuming, we found the best way is to remove as much material as possible by carefully pushing the residue up off the metal with square toothpicks or the bamboo tool cut at a chisel point. Then, with a small amount of Naptha on a Kimwipe clean the remaining residue with 1 or 2 swipes on that area. Now the film back should be prepared for new seals.
Basic Installation Guidelines
Hinge Seal, back cover
Install this seal centering it between the top and bottom edge of the back cover and the cut out for the strap.
Latch plate channel seal, back cover
Also, install this seal centering it in the channel next to the door latch per the image.
Top channel seal, camera body
Install the upper and lower camera body channel seals starting at the hinge side of the camera body. Working from right to left, butting the channel seal up against the hinge seal. The upper channel has the counter actuation lever. You will need to install this seal as close to each side of the counter lever opening as possible, cutting the seal as required.
Door channel seals, back cover.
Install the upper and lower back cover channel seals starting as close to the hinge seal as possible, working from left to right. Tech note. The XA1 back cover top channel seal is shorter than the lower, as designed by Olympus.
First of all, the most important and time-consuming work is removing the old seals. Important to focus on clean, clean, super clean. Also, clean the old residue from the back cover area, door hinge area and anywhere else you see a seal will be replaced. The finest adhesive in the world will not adhere to that sticky, gooey residue that was once a quality light seal. Furthermore, proper installation will give you thousands of light tight exposures.
USCamera | Parts for cameras, flash, lens plus | light seal kits, foam sheets | USCamera Light Seal Placement Guide | Olympus XA1
As a 1979 graduate of National Camera's resident camera repair school, is where I found what I best at and wanted to do for the rest of my working career. After camera repair school, I found my gift was the ability to easily understand complex electro-mechanical photo products. I could take almost any imaging item apart, cameras, lenses, slide/movie projectors plus more, understand how the unit functioned, and repair it. Then, accurately reassemble it into a fully working unit. In 1980, I was employed in Denver as a technician for the largest Colorado camera service center performing repair and service of both in and out of warranty for over 38 brands of photographic equipment, accumulating over 5000 hours of bench time.
In 1983, I started Technik Camera as a self-employed contractor and general technician. Within a few years, I employed 4 more technicians, 2 people as support staff, and more. I accumulated another 40,000 hours of bench time as we serviced 110mm, 35mm, medium format film cameras, lenses, flash, enlargers, timers, paper processors, long roll portrait cameras, and more. The challenge of successfully taking anything photographic apart and reassembling it into an accurately working piece... and you could not tell I took it apart, was very satisfying for me. Before 1998, we attended many training seminars hosted by factory trainers from Canon, Fuji, Konica, Mamiya, Minolta, Nikon, Olympus, Pentax, and more.
Except for a few products, I have worked on most equipment made and thoroughly enjoyed it. When digital products came to market, I didn’t find the digital service as satisfying as film equipment. So I took the time to develop a website that supported digital/film cameras, lenses, other imaging items with parts and service information. I continued to service my equipment and several customers who maintained large collections. The challenge of successfully taking anything photographic apart and reassembling it into an accurately working piece... and you could not tell I took it apart, was enough for me. I have attended many training seminars hosted by factory trainers from Canon, Fuji, Mamiya, Minolta, Nikon, Olympus, Pentax, and Ricoh. I have special tools and test jigs required for many repairs for Canon, Pentax, Rollei, Rolleiflex, and more.
I do not work on studio flash. I don't care much for Alpha, Bronica S2 S2a, some Contaflex, and Kodak leaf shutter reflex mirror cameras plus a few others. I enjoy working on almost everything related to film, though in the last few years my focus is on equipment that will not require parts I don’t have. I am adding to the product service list on the service page. I could not include everything I work on there. Sometimes customers will ask if I can fix their model and I am surprised it wasn’t listed. I was working on photo products long before websites were here and I have not needed to advertise for years. I have plenty of my cameras to maintain as well as many local camera collectors with large collections. So do not hesitate to contact me with a service question about your equipment. I am sure I can take care of any issue you may have with the maintenance or service required with your film cameras, lenses, and more. I was working on photo products long before websites were here and I have not needed to advertise for years. Kindest regards, Gray.