Olympus OM1 OM2 Light Seal Placement Guide
Olympus OM1 OM2 Light Seal Placement Guide
Before doing anything, please go here.
USCamera Since 1998 | Service Parts for Cameras Lenses | Light Seal Kits | Vintage Film Cameras | Olympus OM1 OM2 Light Seal Placement Guide
For more information on purchasing this kit, go here
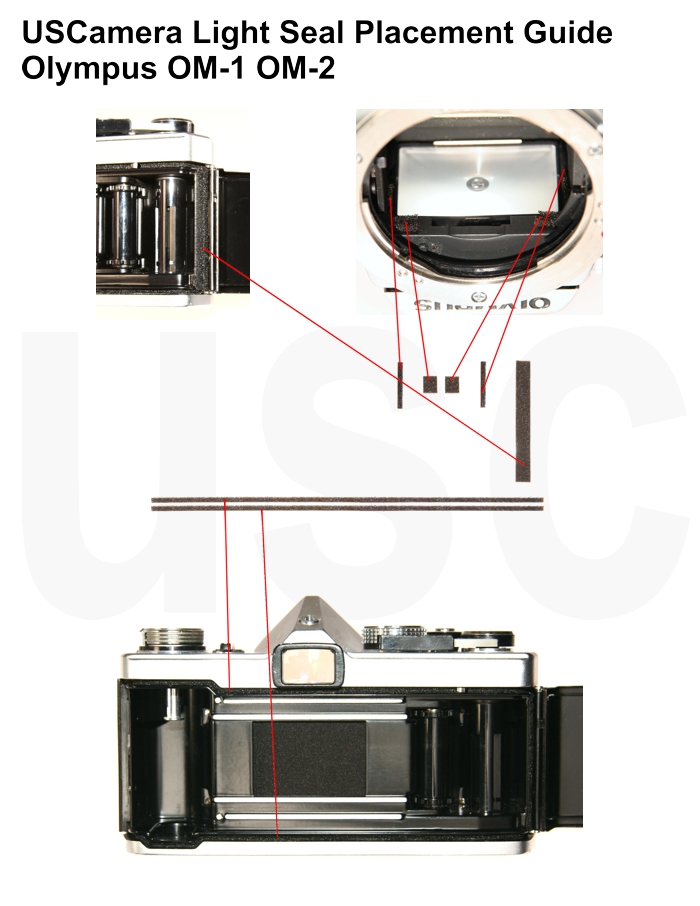
You are installing a 7 piece kit for the Olympus Om1 Om2.
This light seal kit includes,
Lower channel seal, camera body – 1 x 1mm
Upper channel seal, camera body – 1 x 1mm
Mirror cushion, L and R front – 2 x 1mm
Mirror cushion, L and R side – 2 x 1mm
Hinge seal, camera body – 1 x 1mm

The most important and time-consuming work is removing the old seals. Focus on clean, clean, clean. Clean the old residue from the door channels, mirror cushion area, door hinge area and anywhere else you are replacing the seals. The finest adhesive in the world will not adhere to that sticky, gooey residue that was once a quality light seal. Proper installation will give you thousands of light tight exposures.
USCamera Since 1998 | Service Parts for Cameras Lenses | Light Seal Kits | Vintage Film Cameras |
Lastly, always made to inspire…see New film camera products.


Thanks for making these available! I do miss the old days in Denver (back when Lindahl’s was in its original location and Ray Pong worked on my Bronica SQ’s and Mamiya C330’s). Wishing you continued success and good health! It’s been fun working on some older gear lately.
Wow,
Hello Stan,
It’s been a long time since somebody mentioned Lindahl’s to me. That place was never the same after Sid passed. Even Ray didn’t really talk about it anymore. He was working solo since I think 1993? He retired in January 2018.
I hope your OM light seal install went well.
Thanks for the flashback,
Jerry