Konica Auto S3 Placement Guide
Konica Auto S3 Placement Guide
For more information on purchasing this kit, go here
Konica Auto S3 Placement Guide
For help installing light seal kits please go here. Following the link to that short read can improve the quality of your light seal installation.
USCamera light seal kit placement guides can really help you also. Especially if the old light seals have already been removed before you acquired the camera. go here
See all USCamera Light seal kits available for Olympus
First of all, the most important and time-consuming work is removing the old seals. Focus on clean, clean, clean. Clean the old residue from the door channels, mirror cushion area, door hinge area and anywhere else you are replacing the seals. The finest adhesive in the world will not adhere to that sticky, gooey residue that was once a quality light seal. Furthermore, proper installation will give you thousands of light tight exposures.
Always exciting, film cameras may be in the past, for now, however, Olympus is still going strong here.
You are installing a 6 piece kit for the Konica Auto S3
This USCamera custom light seal kit includes,
Top channel seal, camera body – 1 x 1mm
Bottom channel seal, camera body – 1 x 1mm
Mirror cushion – 1 x 1mm
Top/bottom, door channel seal, back cover, latch end – 2 x 1mm
Hinge seal, camera body – 1 x 1mm
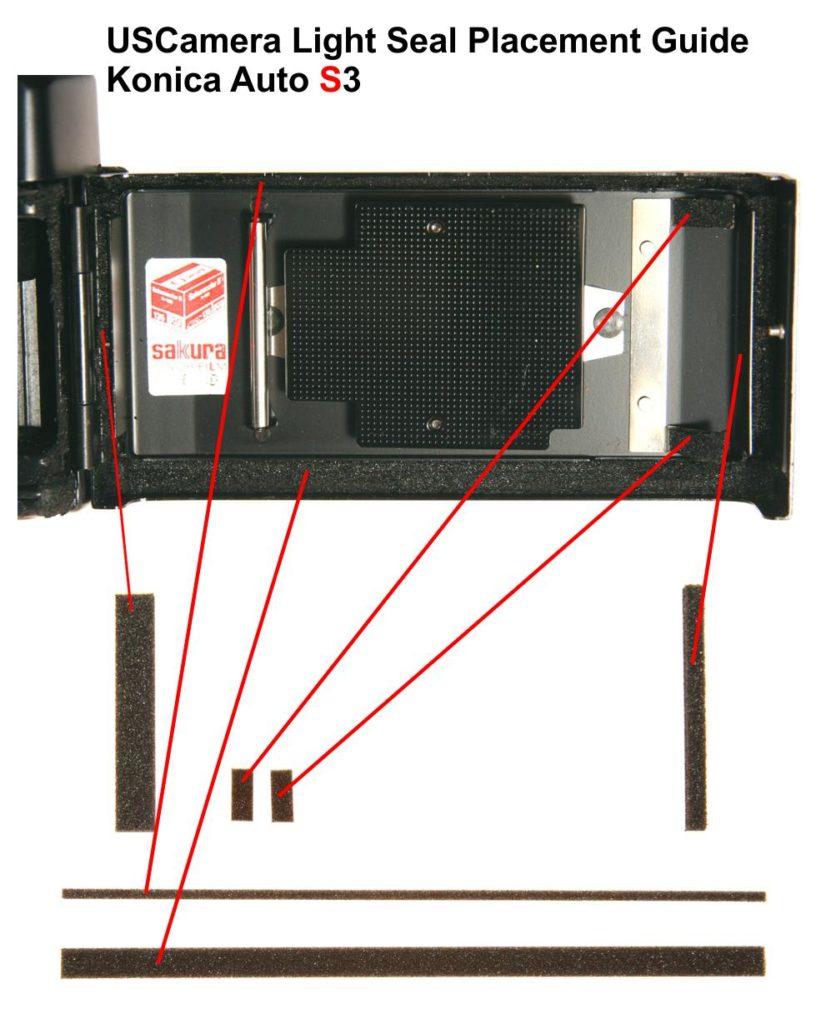
Somewhat unusual for film cameras, this model Konica only uses light seals on the back cover assembly…..
TechNote: The hinge baffle plate seal can be a tricky install. I recommend practicing with a thick piece paper the same size as the seal, so you can get a feel of how that seal needs to slide into place. For a smooth installation, using Purell or another additive free hand sanitizer as an adhesive delay agent on both the light seal adhesive itself and location on the back cover is highly recommended.
I do not advise you to try and bend or flex the hinge baffle plate. Carefully flex the plate just a hair farther away from the cover and finish will crack and flake off. That’s not far enough nor can you hold the flexed plate in position and install the seal. When Konica assembled the back cover, they put foam where needed and then assemble the back as a unit. Always open to your comments.
The most important and time consuming work is removing the old seals. Focus on clean, clean, clean. Clean the old residue from the door channels, mirror cushion area, door hinge area and anywhere else you are replacing the seals. The finest adhesive in the world will not adhere to that sticky, gooey residue that was once a quality light seal. Proper installation will give you thousands of light tight exposures.
See all USCamera light seal kits for Konica and more, start here.
USCamera Since 1998 | Pro Light Seal Installation Available | Light Seal Kits | Vintage Film Cameras | Konica Auto S3 Placement Guide
Lastly, always made to inspire…see New film camera products.