
Canon Canonet QL17 GIII Light Seal Placement Guide
Canon Canonet QL17 GIII Light Seal Placement Guide
Before doing anything, please go here
Canon Canonet QL17 GIII Light Seal Placement Guide
For more information on purchasing this kit, go here
You are installing a 6 piece kit for the Canon Canonet QL 17 GIII | QL 19 GIII | QL 19N | QL 28
This light seal kit includes,
2 x 2mm – long back cover seals
1 x 2mm – back cover latch plate channel seal
1 x 1mm – channel seal camera body
2 x 1mm – small seals by the latch plate
General Installation Guidelines
Tech Note. This camera uses a special material for hinge seal on the camera body that does not need replacement. This seal is a felt type material that does not wear out. Now that many of these cameras are 50 plus years old we still find that seal in excellent condition. Replace only if it is missing.
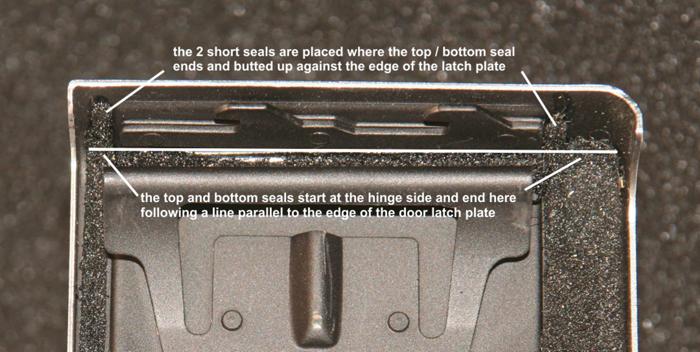
Latch plate seal, back cover. Install by centering this seal on the metal edge by the door latch plate. Easiest to expose a little more working room if you carefully move the top of the film cassette spring with your left-hand index finger (or a Popsicle stick) and with other hand holding the seal with tweezers, put the seal in place.
Door seals, back cover. Install the upper and lower back cover seals starting at the hinge side on the back cover, working from left to right. The back cover channel seals start and the edge of the cover and will end almost even with the door edge per the picture. It is wrong to assume that the seal should extend up the side of the door next to the latch. You want to replace the material in exactly the same way it was originally installed. If the seals are completely missing, we are explaining exactly how Canon Authorized Service Facility technicians installed it.
Door Channel Seal, camera body. Install this seal starting on the right side laying it up to the counter actuation lever. Cut the seal and start again on the other side of that lever. You do not want to cover the lever or opening with foam or adhesive.
Installation Placement Images
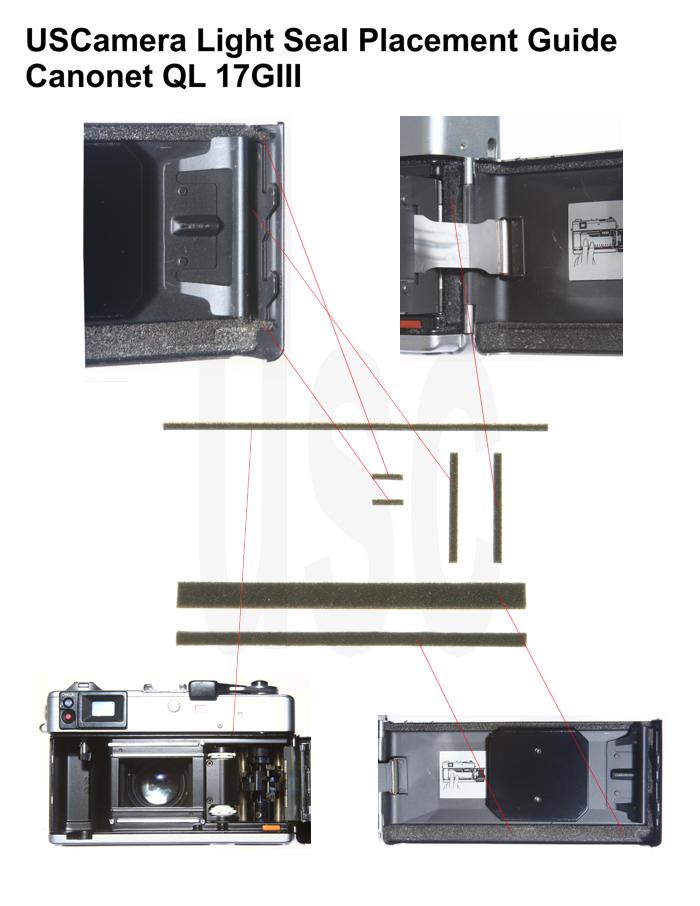
The image below gives you a little more information on the proper installation of the seals at the back cover latch end.
The most important and time-consuming work is removing the old seals. Focus on clean, clean, clean. Clean the old residue from the door channels, mirror cushion area, door hinge area and anywhere else you are replacing the seals. The finest adhesive in the world will not adhere to that sticky, gooey residue that was once a quality light seal. Proper installation will give you thousands of light tight exposures.
USCamera thousands of parts, camera, flash, lens, light seals plus more. Canon Canonet QL17 GIII Light Seal Placement Guide
Lastly, always made to inspire…see New film camera products.


hi ! i’m interested in purchasing this kit, but my camera is not the QL17 Giii but the QL28, is it the same installation plan ? to me it looks totally similar.
Also, do you sell tools to clean and install the light seals ?
thank you
Yes, the QL28 uses the same seal kit as the QL17 GIII. We include a bamboo tool with each light seal kit to help remove the old foam and install the new. We do sell those in packages of 10 pieces. If you want curved or straight tweezers we have those also. Click on tools. Let me know if I can help.
Any advice for cleaning out the old seals? I’ve read that using lacquer thinner will help dissolve the old material. Is this safe for the camera or is there a better way?
First, I use the bamboo tool. I use sandpaper to make a chisel like edge on the blunt end. Then carefully scrape as much of old foam off as you can. You can remove most all of the old foam and dried adhesive by scraping it off. You may only need a solvent to remove the residual adhesive that is leftover. I first use naphtha as a solvent and get the area where I am placing new seals as clean as possible. Lastly I use a ketone like acetone or MEK make the surface spotless. I did try lacquer on a Q-tip and that seemed to help remove the adhesive residue. You have to be very careful as solvents can remove the flat black paint on the QL17 back cover. Good luck with your install.